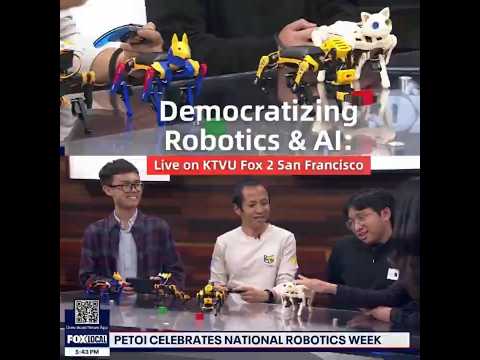
In today's tech-driven world, learning robotics isn't just for seasoned engineers — it's for anyone curious about how machines move, think, and react. Whether you're a student exploring STEM (Science, Technology, Engineering, and Math), a hobbyist looking to tinker, or a parent introducing your child to coding and AI, with today’s kits, you can dive in with zero prior experience.
To help you begin, we’ve selected 5 beginner-friendly robotics projects that use ready-made kits to teach essential concepts like programming, automation, and mechanical design. Each project targets a different skill area—such as movement, logic, or autonomy—offering a well-rounded, hands-on introduction to the world of robotics that's both educational and fun.
Overview
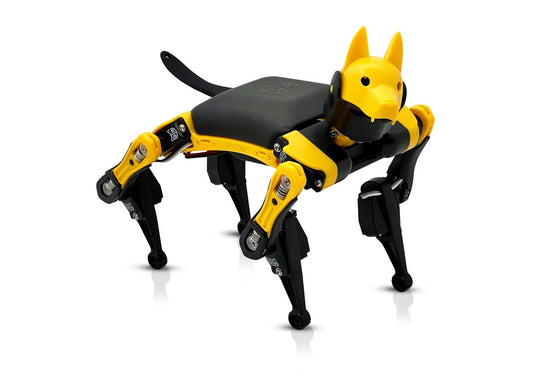
- Project 1: Obstacle Avoidance with Petoi Bittle/BIttle X Robot Dog
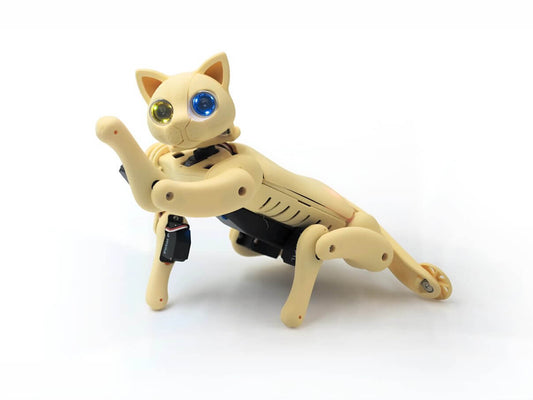
- Project 2: Crafting Custom Moves & Dancing with Petoi Nybble/Nybble Q Robot Cat
- Project 3: Your First Robotic Arm with Makeblock mBot Ultimate - Beginner Robotics Project
- Project 4: Line Following with Apitor Robot X
- Project 5: Building a Smart Vehicle with LEGO Boost Creative Toolbox 17101
- Your Journey into Robotics Starts Now!
-
Frequently Asked Questions (FAQ)
Project 1: Obstacle Avoidance with Petoi Bittle/BIttle X Robot Dog

Understanding the Why
Wouldn't it be amazing if your robot pet could navigate a room on its own? This project will show you how to give your robot dog the ability to avoid obstacles,
What You'll Achieve
You'll program your Petoi Bittle X to detect obstacles in its path and autonomously react by stopping, backing up, and turning to find a clear route. This project builds foundational skills in autonomous navigation and environmental awareness.
Enhanced Tracking and Obstacle Avoidance for Robots:
What You'll Need
-
A computer with Arduino IDE installed
-
Various household objects to serve as obstacles (boxes, books, etc.)
Your Step-by-Step Guide
-
Build & Set Up Your Robot Dog: If you get the construction kit, you will spend an hour assembling, uploading firmware, and calibrating your robot dog. Then you can use Petoi Mobile App to control it with 35+ built-in commands.
-
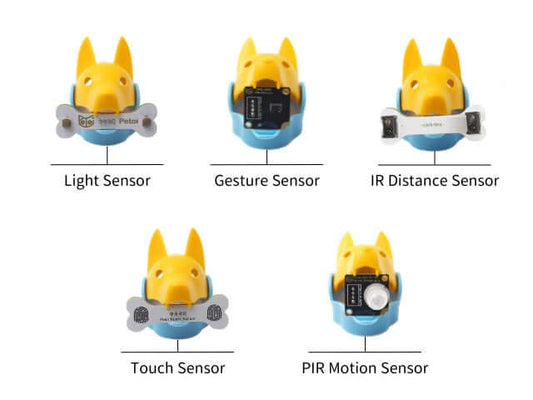
Mount the Distance Sensor: You'll securely attach the IR distance sensor to the front of your Petoi Bittle, ensuring it has an unobstructed view forward.
-
Wire the Sensor: You'll connect the sensor's pins (VCC, GND, and signal) to the appropriate digital or analog input pins on your Petoi Bittle’s microcontroller(NyBoard or BiBoard).. You'll refer to the Petoi documentation for the specific IR distance sensor for correct wiring.
-
Test Sensor Readings (C++): You'll write a simple C++ program in Arduino IDE to continuously read the distance reported by your sensor and display it on the serial monitor. You can then move your hand or an object closer and farther from the sensor to verify its accuracy.
-
Program Obstacle Avoidance Logic (C++):
-
Define a "Danger Zone": In your C++ code, you'll set a threshold distance (e.g., 5cm). If an object is detected closer than this, your Petoi Bittle will be programmed to react.
-
Implement Decision Tree:
-
If no obstacle is detected within the danger zone, Petoi Bittle X will continue to walk forward.
-
If an obstacle is detected, Petoi Bittle X will be programmed to:
-
Stop its current movement.
-
Back up slightly (by calling a reverse gait function).
-
Turn (e.g., a specific angle left or right, or randomly choose a direction, by calling appropriate turning gait functions).
-
Check for obstacles again in the new direction.
-
-
-
-
Test in an Obstacle Course: You'll create a simple "maze" with household objects. Upload your C++ code and observe how your Petoi Bittle navigates. You'll have the chance to refine your code's turning angles, speeds, and sensor thresholds for smoother and more reliable avoidance.
-
Additional Challenge with a Robotic Arm Gripper: You'll use Bittle X+Arm with the distance sensor to pick up a block at the beginning line, carry it around to navigate out of the maze, and drop it off at the finishing line.
Engineering Skills You'll Learn
-
Distance Sensing: How robots perceive depth and proximity in their environment.
-
Autonomous Navigation Fundamentals: Principles of how robots explore and avoid collisions without human guidance.
-
Algorithmic Thinking: Develop a step-by-step process for problem-solving (e.g., "if X, then Y, else Z")
-
C++ Programming: Gain hands-on experience with a powerful text-based programming language commonly used in robotics.
Project 2: Crafting Custom Moves & Dancing with Petoi Nybble/Nybble Q Robot Cat

Understanding the Why
How can you program a robot to perform unique movements or even a custom dance? This project will show you how to bring a robot to life through creative choreography.
What You'll Achieve
With a Petoi Nybble or Nybble Q, you can master the art of programming complex, multi-jointed movements, creating custom gaits and unique "tricks" using a visual, block-based coding environment. This project will introduce you to behavioral programming for dynamic robotic pets.
What You'll Need
-
A computer with Petoi Coding Blocks, Petoi Desktop App, and optionally Arduino IDE installed
Notes: Even though the tutorial uses a Bittle robot dog, you can substitute a Nybble or Nybble Q robot cat for the project.
Step-by-Step Guide
-
Build & Set up Your Robot Cat Nybble: If you get the construction kit, you will spend up to 4 hour assembling, uploading firmware, and calibrating your robot dog. Then you can use Petoi Mobile App to control it with 35+ built-in commands.
-
Explore Existing Gaits: Load Petoi’s default walking or standing gaits onto your robot. Observe closely how each leg's servos move in sequence to achieve the desired motion. Pay attention to the coordinated action.
-
Learn Servo Control Basics: Using the block-based coding interface, experiment with commanding individual servo motors on your Petoi robot to move to specific angles. Try moving just one limb: lifting it, bending the knee, or extending the foot.
-
Define a Custom Pose: Choose a unique static pose for your Petoi Nybble Q (e.g., sitting up, pawing the air). Through trial and error, find the precise angle for every relevant servo to achieve that pose. Note down the angles and movement directions. Then use the Skill Composer from Petoi Desktop app to design them.
-
Refine and Smooth: Experiment with the speed and smoothness of transitions between poses or steps on the Skill Composer. Observe how changing the delay between actions impacts the overall look of the movement.
-
Sequence Poses for a Simple "Trick":
-
Use the block-based coding interface to chain together several custom poses or simple servo commands to create a short sequence, like a "wave," a "bow," or a "spin in place." You'll define delays between each step to make the movements flow smoothly.
-
-
Optional Intermediate Robotics Project: use Arduino IDE to send the appropriate serial commands, make Nybble head animate by using a Math function to calculate its movements.
Engineering Skills You'll Learn
-
Degrees of Freedom (DOF): Understand how each joint contributes to a robot's overall range of motion.
-
Gait Cycles: Learn the basic principles behind animal locomotion and how to translate them into robot movements.
-
Servo Motor Control: Gain precision in commanding multiple servo motors simultaneously.
-
Behavioral Programming: Develop sequences of actions that create realistic or expressive robot behaviors.
Project 3: Your First Robotic Arm with Makeblock mBot Ultimate

Understanding the Why
How can a robot arm pick up and move objects? This project helps you understand the basics of robotic movement and control, specifically focusing on how a robotic arm works.
What You'll Achieve
You'll build a functional robotic arm using the Makeblock mBot Ultimate kit and program it to perform simple pick-and-place tasks. This project introduces you to mechanical assembly, motor control, and basic automation.
What You'll Need
-
A computer or tablet with the Makeblock programming software (mBlock) installed
-
Small, lightweight objects to pick up (e.g., a toy block, a small ball)
Step-by-Step Guide
-
Assemble the Robotic Arm: Follow the detailed instructions in your Makeblock mBot Ultimate manual to assemble the robotic arm attachment. Pay close attention to how the different parts connect and how the motors are integrated to allow for movement at various joints.
-
Connect to Software: Connect your assembled mBot Ultimate robot to your computer or tablet using the provided cable or Bluetooth. Open the mBlock software.
-
Basic Motor Control: Use the block-based coding interface in mBlock to experiment with controlling individual motors on the robotic arm. Try making the arm move up and down, or the gripper open and close. Understand how changing motor direction and power affects movement.
-
Program a Pick-and-Place Sequence: Create a simple program that includes the following steps:
-
Move the arm to a starting position.
-
Move the arm down to pick up an object.
-
Close the gripper to grasp the object.
-
Lift the arm with the object.
-
Move the arm to a new location.
-
Open the gripper to release the object.
-
Return the arm to its starting position.
-
-
Test and Refine: Place your small object in front of the robotic arm. Upload your code and observe if the robot successfully picks up and places the object. Adjust the timing and motor movements in your code until the arm performs the task smoothly.
Engineering Skills You'll Learn
-
Mechanical Assembly: Hands-on experience building complex structures from components.
-
Motor Control: Understanding how to command motors for precise movement.
-
Sequencing: Learning to arrange commands in a specific order to achieve a desired action.
-
Basic Automation: Grasping how robots can perform repetitive tasks autonomously.
Project 4: Line Following with Apitor Robot X

Understanding the Why
How can a robot "see" a line on the ground and follow it without human help? This project introduces you to how robots use sensors to navigate their environment.
What You'll Achieve
You'll program your Apitor Robot X to detect and follow a specific path (like a dark line on a light surface) using its built-in sensors and simple programming logic. This project introduces basic robot autonomy and sensor integration.
Line Following in the city
What You'll Need
-
A smartphone or tablet with the Apitor APP installed
-
Black electrical tape or a thick black marker to draw a line on a light-colored surface (e.g., a white poster board or floor)
Step-by-Step Guide
-
Assemble the Robot X: Follow the assembly instructions provided with your Apitor Robot X kit. Ensure the line-following sensors (usually located underneath the robot) are correctly installed and facing downwards.
-
Connect to the Apitor APP: Turn on your Robot X and connect it to the Apitor APP on your smartphone or tablet via Bluetooth.
-
Understand Line Sensors: The Apitor Robot X uses infrared (IR) sensors to detect lines. These sensors emit light and measure how much it reflects back. A dark line absorbs more light, so less reflects, indicating the line's presence.
-
Program the Line-Following Logic: Use the block-based coding interface in the Apitor APP to create a program:
-
If both sensors are on the line, go straight.
-
If the left sensor is off the line (meaning the robot is drifting right), turn slightly left.
-
If the right sensor is off the line (meaning the robot is drifting left), turn slightly right.
-
-
Test and Calibrate: Create a simple track with black electrical tape on a light surface. Upload your code to Robot X and put it on the line. Observe its behavior. You might need to adjust the turning speeds or the sensitivity of the sensors in your code to make the robot follow the line smoothly without wobbling too much or drifting off.
Engineering Skills You'll Master
-
Sensor Integration: Understanding how robots use sensors to gather information about their surroundings.
-
Conditional Logic: Programming your robot to make decisions ("if this, then do that") based on sensor data.
-
Basic Autonomous Behavior: Learning how simple rules allow a robot to navigate and react to its environment without constant human intervention.
-
Debugging: The process of finding and fixing errors in your code or the robot's behavior.
Project 5: Building a Smart Vehicle with LEGO Boost Creative Toolbox 17101

Understanding the Why
How can simple building blocks come alive with motors and sensors? This project shows you how to combine physical construction with digital programming to create a moving, interactive robot.
What You'll Achieve
You'll build a basic drivable vehicle using the LEGO Boost Creative Toolbox and program it to move, react to colors, or make sounds. This project enhances your creative building skills, introduces graphical programming, and demonstrates sensor-based interaction.
What You'll Need
-
A smartphone or tablet with the LEGO Boost App installed
-
Clear space to test your robot
Step-by-Step Guide
-
Build Vernie the Robot (or a simpler vehicle): The LEGO Boost kit comes with instructions to build Vernie, a robot that can be configured into a drivable vehicle. Follow the step-by-step 3D building instructions in the LEGO Boost App. Notice how the motors and color/distance sensor are integrated into the build.
-
Connect to the App: Once built, connect your LEGO Boost model to the LEGO Boost App via Bluetooth. The app is your programming interface.
-
Basic Movement Programming: Use the drag-and-drop block-based coding interface in the app. Experiment with programming your vehicle to move forward, backward, turn, and stop. Understand how changing power and duration affects its movement.
-
Add Sensor Interaction: Incorporate the color and distance sensor into your program:
-
Color Reaction: Program the robot to perform an action (example: stop, turn, sing a melody) when it detects a specific color in front of it. Place different colored LEGO bricks or objects in its path to test this.
-
Distance Reaction: Program the robot to stop or turn when it gets too close to an obstacle, using the distance sensing capability.
-
-
Test and Customize: Test your programmed vehicle in an open space. Refine your code to make its movements smoother or its reactions more precise. Get creative by adding more movements and sounds, or even combining sensor inputs for more complex behaviors.
Engineering Skills You'll Master
-
Creative Building: Developing design and construction skills using modular components.
-
Graphical Programming: Learning to code using intuitive drag-and-drop blocks, making complex logic accessible.
-
Sensor-Based Interaction: Understanding how robots can perceive and react to their immediate environment (colors, obstacles).
-
Problem-Solving: Iterating on your design and code to achieve desired robot behaviors.
Comparison
| Kit Name | Price | Best For | Programming Level | Hardware Complexity | Core Kills Learned |
|---|---|---|---|---|---|
| Petoi Bittle , Nybble robots | Starting at $269 | Beginners to advanced robotics/STEM learners, including users aged 10+, teens, adult hobbyists | Beginner to Intermediate - Block-based, + Python, Arduino C++ | Easy to High (joint servo movement, sensor integration) |
Basic hardware components and robot assembly. Basic coding concepts, gait design, servo control, behavioral programming, obstacle avoidance with sensor programming, etc |
| Makeblock mBot Ultimate | Starting at $478 | Middle/high school students, STEM educators | Beginner (Block-based with option to transition to Python) | Moderate to High (mechanical assembly) | Mechanical design, motor control, automation |
| Apitor Robot X | Starting at $100 | Kids, early STEM learners | Beginner (Block-based coding via app) | Low (snap-together build) | Line following, sensor logic, basic autonomy |
| LEGO Boost 17101 | Starting at $310 | Kids, families, coding beginners | Beginner (App-based graphical coding) | Low to Moderate (LEGO build with sensors) | Creative building, event-driven programming, sensor response |
Your Journey into Robotics Starts Now!
These beginner-friendly projects are fantastic starting points for anyone eager to explore the world of robotics. They are a foundation for future innovation. Each robotics project builds engineering, coding, design, and automation skills while sparking curiosity for real-world applications. They are also suitable for a school-friendly robot project or a K12 school robot project. These kits help learners grow from simple builds to complex robotics and AI. With every project, you gain practical experience and the confidence to tackle bigger challenges.
Ready to build, code, and innovate? Click on the product links to get your own robotics kit and begin your exciting engineering adventure today!
-
Petoi Bittle/Bittle X
-
Petoi Nybble/Nybble Q
Frequently Asked Questions (FAQ)
Q: Do I need prior robotics experience to try these projects?
A: No prior experience is required! All five projects are designed with beginners in mind. Each kit comes with guided instructions and beginner-friendly software (most use block-based coding), making it accessible even if you're new to programming or engineering.
Q: What computer or device do I need to run these projects?
A: They all support Windows and Mac. Check each kit's requirements before purchasing to ensure compatibility.
Q: What programming languages are used in these projects?
A: These kits support a mix of programming languages:
-
Block-based coding (similar to Scratch) is used for Petoi Bittle/Nybble robots, Apitor, LEGO Boost, and mBot Ultimate for easy drag-and-drop programming.
-
Python can be used for Petoi Bittle/Nybble robots, LEGO Boost, and mBot Ultimate.
-
C++ can be used for Petoi Bittle/Nybble robots, giving you real-world experience with the most common coding language in robotics projects.
-
Petoi Skill Composer is a robot skill design software for designing new moves.
Q: Can I expand or change projects beyond basic guides?
A: Absolutely! Each kit is highly customizable:
-
You can tweak code, add new movements or behaviors, integrate sensors, or redesign mechanical parts.
-
As you progress to intermediate and advanced levels, you can go deeper into AI, machine learning, or 3D-printed enhancements with Petoi robot dog Bittle and Nybble robot cat family
Q: Are these school-friendly projects?
A: These robots all come with assembly, coding guides, and sample application codes. But if you are looking for a robotics curriculum for your project, Petoi robots stand out with their support of block-based coding, Python, and C++ curriculums.